Summer Marinated Grilled Flank Steak
We love to grill in the summer, as I'm sure most of you do too! Flank steak is a cheap steak that if prepared and sliced properly, you have a wonderful result.

We love to grill in the summer, as I'm sure most of you do too! Flank steak is a cheap steak that if prepared and sliced properly, you have a wonderful result. This is a great simple recipe to take your Flank Steak to the next level. In the summer we will pair this steak with a big salad or serve with a bunch of fresh veggies.
Would love you to share you summer grilling recipes!!
-Chris
Citrus Marinated Flank Steak
Yield: 4 servings
Ingredients
· The juice of 1 orange
· The juice of 2 limes
· ¼ cup extra virgin olive oil
· 2 garlic cloves, roughly chopped
· 1 tablespoon chipotle chili powder
· 3 tablespoons chopped cilantro
· 1 teaspoon ground cumin
· 1 teaspoon salt
· 2 pound flank steak
Instructions:
- Whisk the orange juice, lime juice, olive oil, garlic, chili powder, cumin and salt in a medium sized bowl. Place the steak in a large, resealable plastic bag and pour the marinade over it. Press out the air, seal the bag and marinate at room temperature for at least 2 hours or in the refrigerator overnight.
- Heat Grill to High. Grill Flank Steak for 5 minutes on first side, drop temperature to medium and turn steak, grill for 5 more minutes or until desired temperature.
- Move the steak away from the direct heat, cover with foil and let rest for 5 minutes.
- Slice thinly against the grain at a 45-degree angle.
Plan Ahead Tip:
Make marinade the night before and marinate steak or chicken overnight for added flavor and less prep the day of.
We also like to make sweet potato mashed or dice up a bunch of sweet potatoes, place them on a sheet pan that you have sprayed with olive oil, drizzle the sweet potatoes with olive oil and top with a little sea salt and cinnamon. Bake the sweet potatoes at 375 degrees until they are soft and caramelized. They taste amazing and are great to serve with this steak.

We are not looking back.....
Today is filled with so many emotions. The past couple of months have surely been a whirlwind with bringing back our little family bakery, to today as the barn renovations begin.

Today is filled with so many emotions. The past couple of months have surely been a whirlwind with bringing back our little family bakery, to today as the barn renovations begin. I came back from the gym and just walked around the barn, looking at all of the little details. It is truly amazing that this barn is still standing since it was built in the early 1800's. I wish the walls could share all of the history with us. We actually have a piece of old barn wood in our bedroom that has the date on it 98', with a bunch of initials carved in. It must be 1898, because if it was 1998 it would have been my brother and I.


I have so many memories of playing in the barn as a child. All the laughter, the exploration of all of the junk in there always hoping to find a hidden treasure. I cannot tell you how many times I climbed up this ladder as a child when we were playing hide-n-seek or just chasing kittens in the barn.
Chris and I have been asking ourselves over the past couple of weeks, are we crazy for doing all of this? But somehow I keep hearing Gods voice of peace and comfort to keep taking that next step. So today, its official, we have our permit and the renovation begins. I cannot wait to watch the transformation and see how Chris our Amish friend, will work throughout this project. His timeline is 4-6 weeks, WOW!!!
We hope you will join us in our journey of the transformation of The Barn. Our hope is it will be ready by the Spring of 2017 for Weddings and Special Events. Be sure to join us for our Blog updates and let your friends know to join too. We will be hosting a contest in the very near future to win a "Free" Wedding at The Barn!
Warmly,
Chris & Becca


The "Farm" Essentials.....

One of the main reasons for starting a blog on our website was to share with everyone all of our favorite recipes, cooking tips and essentials that we use every day on "The Farm." About 6 months ago I was introduced to the concept of using Essential Oils for our health, in our everyday cleaning and also cooking. As a family we have greatly benefited from utilizing them in so many different ways, that I had to share a few of my favorites.
My father has suffered from seasonal threats throughout his entire life. He was constantly clearing his throat, especially during peak season. My Dad now takes 1 teaspoon of local raw honey with a few drops peppermint, lavender and lemon essential oil, in the morning and evening. His throat clearing is completely gone and he is off all of his other medications. What a blessing this has been for him.
Living on "The Farm" we also have our share of bugs and my kids are constantly getting cuts and scrapes!!! Anytime my kids get a bug bite or an owie, I put a little lavender and/or melaleuca on them. It immediately stops the itching and takes the inflammation away. Now, my kids run to me asking for some oils to put on their ouchies.
Lastly, I have looked for a dryer sheet for the longest time that are free from chemicals and that work well, but have been unsuccessful until now. I now use 4 wool dryer balls in each dryer load with a few drops of my favorite essential oil on them. Lemongrass and Lavender are my two favorite smells, but there are so many to choose from. I also love to put a few drops of Purify or Lemongrass in the actual washer, especially with my stinky work-out clothes. Our clothes come out smelling amazing and static free, but most importantly free from all of the chemicals that are found in dryer sheets.
If you are interested in learning more about how to incorporate essential oils into your household please do not hesitate to reach out to me directly. I would be more than happy to assist you. I have chosen DoTerra Essential Oils as they are a high quality Certified Therapeutic Grade Oil. Please Click Here to learn more about essential oils.
Be sure to sign up for our Newsletter, I will post new ways to use Essential Oils on our blog on a regular basis.
Warmly,
Becca

Homemade Spelt Banana Bread
I absolutely love Homemade Banana Bread. This particular recipe is great because the flaxseed meal, oats and walnuts enhance the flavor, while the greek yogurt gives it a nice balance of protein.

I absolutely love Homemade Banana Bread, however when I had to completely overhaul my diet, I was upset to think that I would not be able to eat baked goods ever again. It is funny how God can use certain things in your life to draw you closer to him. Because of this, I became really passionate about finding ways to make the foods I loved and grew up on, but also make them work in my new diet. You can check out my full story of getting fit both physically and spiritually on 2 Chicks Get Fit. My cousin Shannon is the one who started this blog and her amazing journey is what is mainly found on this site. I have to say she has continued to inspire me with her strong testimony of faith in all that she does. This is a blog about both of our journeys and how God has used us, but Shannon continues to fill our site with inspiration and a total dependance on God's leading for her life that is inspiring to me in so many ways.
The reason I altered this recipe was to take an old staple filled with white flour and sugar, and use Spelt flour and coconut palm sugar as the sweetner to give this favorite a nice healthy twist. This particular recipe is great because the flaxseed meal, oats and walnuts enhance the flavor, while the greek yogurt gives it a nice balance of protein. This is perfect to enjoy for breakfast and is definitely something the kids will love too!
Enjoy!
Becca
Ingredients:
- 1 1/2 Cups of Spelt Flour- (You can use regular flour in place of spelt if you prefer)
- 1/4 Cup of Flaxseed Meal
- 1/4 Cup Rolled Oats - We use Bob's Red Mill Gluten Free Oats
- 1/2 Cup of Ground Toasted Walnuts (optional)
- 1 teaspoon of Baking Powder
- 1/2 teaspoon of Baking Soda
- 1/2 teaspoon of Salt
- 1/3 Cup of Canola Oil
- 1/2 Cup of Coconut Palm Sugar
- 2 Large Eggs
- 1/3 Cup of Plain Greek Yogurt
- 1 Cup of Mashed Bananas - (2 Medium Bananas)
- 1 teaspoon of pure vanilla extract
- 1/2 Cup of "Enjoy Life" Chocolate Chip (optional)
Pre-heat oven to 350 degrees F and position rack in the middle of the oven. Lightly grease and flour a 5-by-9 inch loaf pan.
In a large bowl, combine flour, flaxseed, oats, walnuts, baking powder and soda, and salt. In a medium bowl stir together the oil, coconut palm sugar, eggs, greek yogurt, bananas, and vanilla. Add the wet ingredients to the dry ingredients and stir gently until combined. Fold in the chocolate chips. Pour batter into loaf pan. Bake about 45 minutes or until toothpick comes out clean. Let bread cool in pan for 20 minutes, then remove from pan and let cool on wire rack.
Slice to desired thickness and serve warm.

How to make the "Perfect" Omelette......
I have to say to helps when you live with an Omelette Chef, but my Dad makes the absolutely best "The Kitchen-Sink" Omelettes. The reason we like to call it a "Kitchen-Sink" Omelette is because whatever we have left in the fridge, goes in the Omelette.
I have to say it helps when you live with an Omelette Chef, but my Dad makes the absolutely best "Kitchen-Sink" Omelettes. The reason we like to call it a "Kitchen-Sink" Omelette is because whatever we have left in the fridge, goes in the Omelette. In the summer we always have a ton of fresh veggies from our Farm Share at Good Work Farm, but we also always have a little bit of some sort of protein, like left over ground beef, some grilled chicken or anything else we can find. The combination of all of these ingredients make the best and most creative Omelettes. Since my Dad is not much of a blogger, I decided I would capture a few of his special techniques that he learned at the CIA and from several years of experience at the restaurant.
We would love you all to share your favorite ingredients you use in your omelettes.
Enjoy!!
- Becca
Tips for Making the Perfect Omelette:
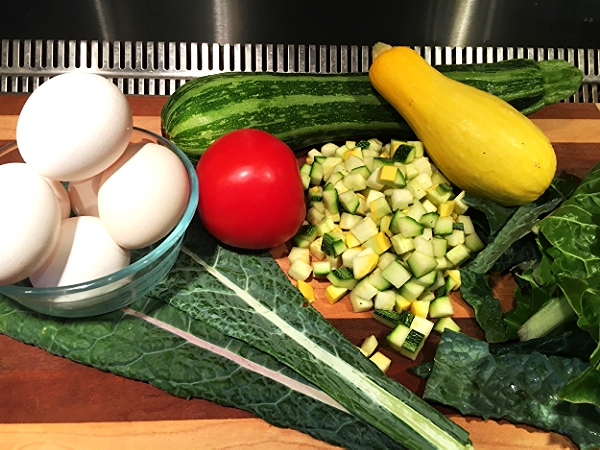
Step 1: Check your fridge to find out what left-overs you have to use in your omelette.
Step 2: Once you have all of your ingredients, dice up all of your veggies, cheeses and proteins ahead of time and leave them laid out on the cutting board until you are ready to use. According to my Dad, this is called a "mise en place" which is a french culinary phrase, meaning putting everything in its place.
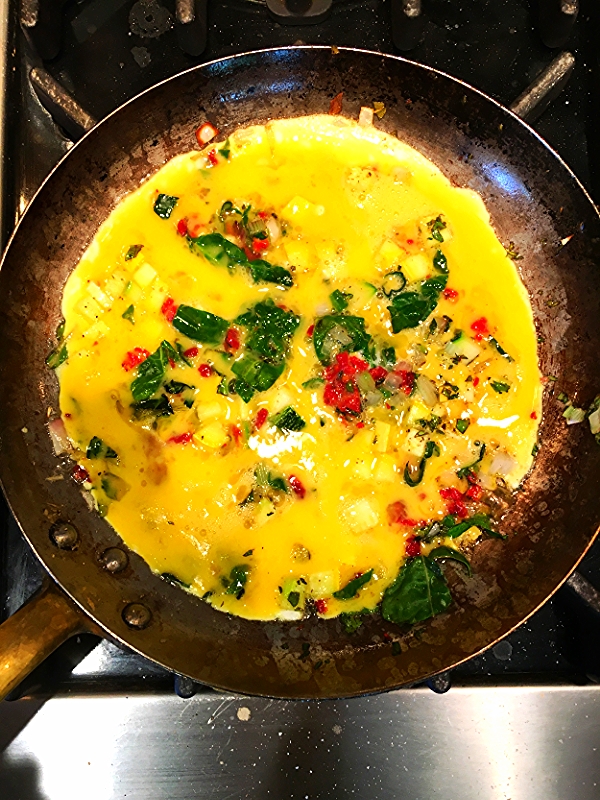
Step 3: Whisk your eggs together until they are light and fluffy. As a rule of thumb, use 3 eggs per person.
*Tip: The fluffier your eggs are after whisking, the fluffier omelette will be.
Step 4: Use a well seasoned steel pan or a non-stick pan. Pre-heat the pan over medium heat for about 3-5 minutes and then add in butter.
Step 5: Lightly sauté all of your veggies and meats for about 2-3 minutes.
*Tip: Never overload your omelette with too many ingredients, unless you plan on adding more eggs.
Step 6: Add in your eggs and swirl the eggs in the pan so they are evenly distributed throughout the vegetables. Let sit on heat until the omelette is no longer runny, but congealed.
Step 7: Flip the omelette to the other side.
*Tip: Before you flip your omelette, using a rubber spatula run it around the rim of the omelette just to loosen from pan so it does not stick when you go to flip it. Using a front to back motion, flip the omelette towards you. This will take some practice. :-)
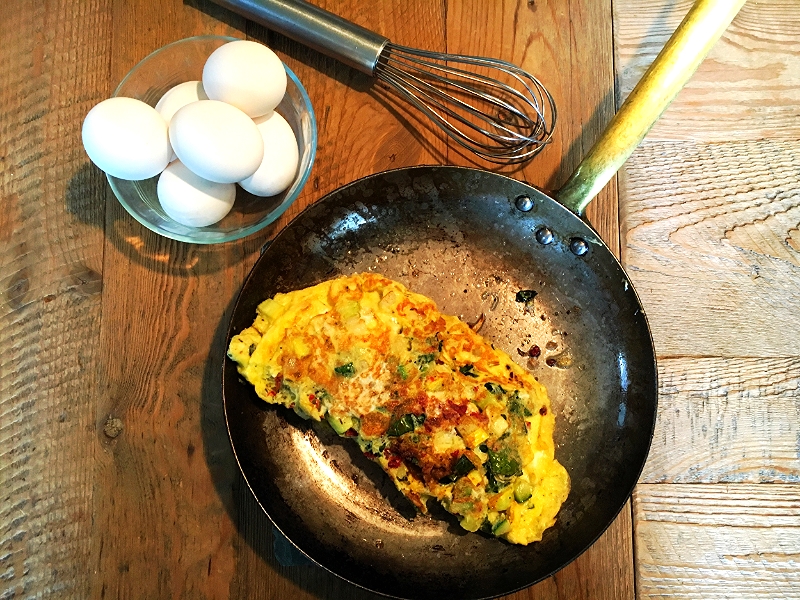
Step 8: Once your omelette is flipped, remove from heat, add in your cheese and put back on the heat. Using your rubber spatula, flip the omelette half way over so you now have a semicircle. Turn your heat to low, put a cover on it until the cheese melts.
Step 9: Remove from heat and plate to serve.